 Often it's the small things that matter most.
OpenOfficeBackup Installation Guide
- Download the package
- Install the OpenOfficeBackup library
- Create a menu entry for the GUI
- Link the backup subroutines to the corresponding OpenOffice event hooks
- Download the package:
- Select and download the package most suitable to your operating system.
- Unpack it to a convenient location. The unpacked installation files can safely be removed after the installation.
- Install the OpenOfficeBackup library:
- Start OpenOffice. It's best to not have any document open at this point.
- From the menu bar select:
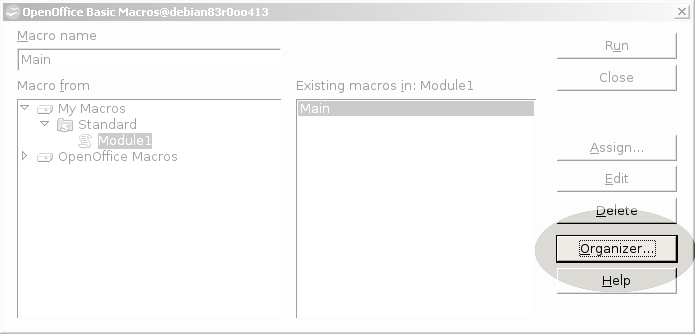
→ Tools → Macros → Organize Macros → OpenOffice Basic...

- From the opening OpenOffice Basic Macro dialogue select:
→ Organizer...
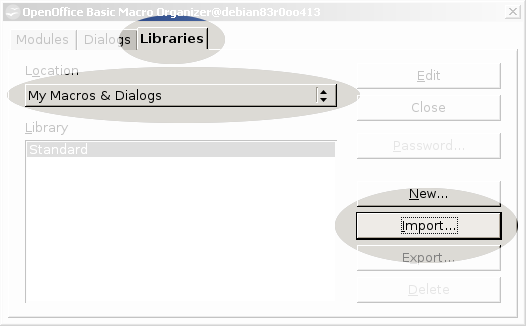
- In the Organizer select the tab:
→ Libraries
make sure the location is set to:
→ My Macros & Dialogs
and select:
→ Import...
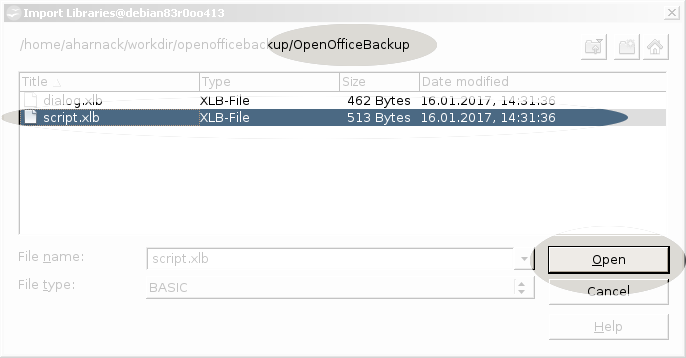
- In the File Picker navigate to the OpenOfficeBackup
installation folder you have unpacked from the download package.
Double click the file:
→ script.xlb
or select it and press:
→ Open
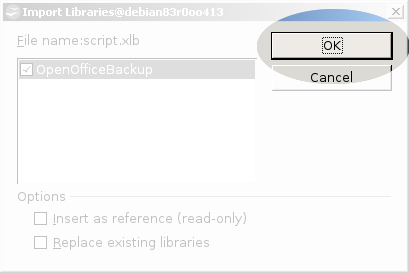
- Confirm the import:
→ OK
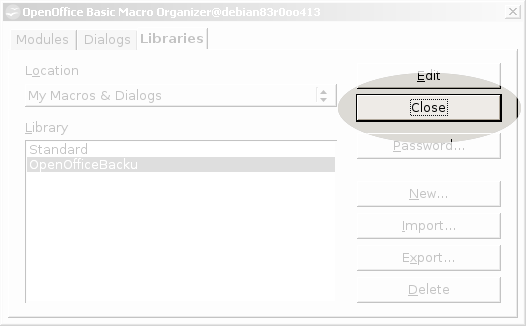
- Close the Organizer:
→ Close
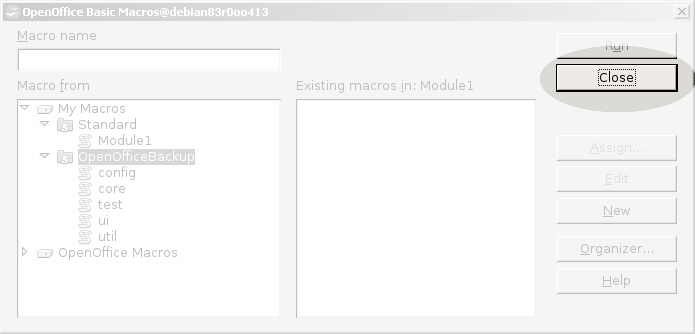
- Close the OpenOffice Basic Macro dialogue:
→ Close
- :
In the OpenOfficeBackup library there is a module ui (user interface). In that module there is a subroutine Backup. That subroutine is the entry for the GUI, which is primarily there to configure the backups. Create a menu entry for that subroutine, so that you can launch the GUI.
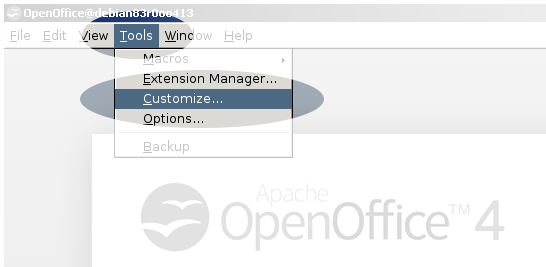
- From the menu bar select:
→ Tools → Customize...

- In the Customize dialogue select the tab:
→ Menus
there select the menu:
→ Tools
select the existing entry above the point where the new entry should appear, for example:
→ Options...
make sure the changes are saved in:
→ OpenOffice
create a group separator:
→ Modify → Begin a Group

- In the Customize dialogue press:
→ Add

- In the opening Add Commands dialogue:
from the Category list select:
→ OpenOffice Macros → My Macros → OpenOfficeBackup → ui
in the Commands list double click on:
→ Backup
or select and press:
→ Add

- Close the Add Commands dialogue:
→ Close

- You can still move the new entry within the list with the arrow buttons next to the list.
- In the Customize dialogue confirm the changes:
→ OK

- The menu settings are document dependent. You'll have to repeat these steps for each document class you are working with (i.e. writer, calc, etc.) A corresponding document has to be open for that.
- From the menu bar select:
- Link the backup subroutines to the corresponding
OpenOffice event hooks:
In the OpenOfficeBackup library there is a module core. In that module there are two subroutines: OnDocumentSaved and OnDocumentSavedAs. These subroutines need to be hooked into the OpenOffice event handlers Document has been saved and Document has been saved as respectively.
- From the menu bar select:
→ Tools → Customize...
- In the Customize dialogue:
select the tab:
→ Events
make sure the changes are saved in:
→ OpenOffice
in the event list select:
→ Document has been saved
press:
→ Macro

- In the Macro Selector dialogue:
from the library tree select:
→ My Macros → OpenOfficeBackup → core
from the macro list select:
→ OnDocumentSaved
complete with:
→ OK

- In the Customize dialogue:
in the event list select:
→ Document has been saved as
press:
→ Macro

- In the Macro Selector dialogue:
from the library tree select:
→ My Macros → OpenOfficeBackup → core
from the macro list select:
→ OnDocumentSavedAs
complete with:
→ OK

- In the Customize dialogue confirm the changes:
→ OK

- From the menu bar select:
OpenOfficeBackup is now installed and ready to be configured.